
When I was a little girl my grandmother started marigolds every winter in a little modified milk garden planter with her seeds from last year’s crop. I loved those marigolds in her brick planters and I still think of her every time I see a marigold.
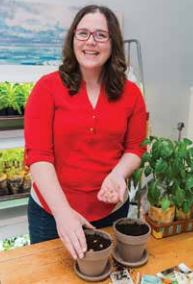
of the popular gardening website
Shifting Roots. (Photo: Supplied)
You really don’t need a grow light or other expensive equipment to start seeds. Seed starting from your window is relatively easy, but there are some limitations.
SOUTH-FACING WINDOWS ARE BEST
First of all, you must have a southfacing window. East-facing ones can work, too, but they must be larger and it also helps if the wall colour of the room is white or light.
If you try to start seeds from other directions, they will get too stretched out or “leggy.” Even better: a southfacing corner window. In our last home we had one (two?) that faced south and east. You’ll also have to turn your plants everyday so they don’t lean too much in one direction.
DON’T START TOO EARLY
I live in Saskatoon, Saskatchewan, on the Canadian Prairies. There simply isn’t enough daylight to sustain my seedlings until mid-February at the very earliest.
Wherever you live, don’t start your seeds until the Persephone days are over – the days generally between November and January when there is less than 10 hours of sunlight a day. The easiest way to figure out when your Persephone days end is to go to the weather app on your phone and calculate how many hours there are from sunrise to sunset. When it reaches 10 hours of daylight, you’re good to plant.
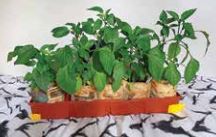
spring 2019 were
started from seed
in front of Kristen
Raney’s south-facing
window.
(Photo: Kristen Raney)
KEEP YOUR HOUSE WARM
Second, you must keep your house warm. This is not the time to be stingy with the thermostat! Many seeds require a temperature of around 21 degrees Celsius to germinate. That’s why you’ll see lots of ads for seed mat warmers in gardening magazines.
YOU’RE NOT THE GREENHOUSE . . . YET
Finally, don’t expect your seedlings to be just like the ones at the greenhouse. The gardeners at your local greenhouse are using grow lights and are fertilizing and watering correctly. That doesn’t mean you can’t succeed; just manage your expectations.
ORGANIZE YOUR SEEDS BY WEEK NEEDED TO SEED START
To start, read the directions on the seed packet to see when you can start those seedlings. For example, plants like artichokes, peppers, brussels sprouts and flowers can be started as early as February. Tomatoes will need to be started in late March or early April.
Plants in our area typically go out on the May long weekend, as that is when the last frost has often past. To figure out when to start your seeds, count the weeks backwards from that date.
Resist the temptation to start your seeds even earlier than recommended. It seems like such a good idea in February, but is a bad one in May when your seedlings have outgrown their containers and they’re difficult to harden off because they’re too big.
Then each week when it’s time to start a new batch of seeds, you won’t have to go searching for the right seeds or, worse yet, miss seed starting something altogether.
THE BEST SEED-STARTING CONTAINERS
Over the years, I’ve tried a lot of different containers to start my seeds. I’ve used egg cartons, reused the plastic containers seedlings come in from the store, jiffy pods, random found objects like plastic yogurt containers, milk jugs and clear plastic bakery containers, and made my own biodegradable newsprint containers. Each type of container has its pros and cons.
EGG CARTONS
Egg cartons are super cute and Pinterestworthy, but they’re actually my least favourite method to seed start. They are not ideal to start seeds that require 6-8 weeks or more indoors.
You’ll have to transplant your starters to larger containers as the roots become too long and start to grow into the egg carton itself. Only start vegetables that require 2-3 weeks indoors.
JIFFY PODS
Jiffy pods are so easy and fun to use – I love them! I also love that you can buy kits that are specifically made for windowsills. Save the plastic parts for reuse, and fill them with new Jiffy pods each season.
Once the roots grow through the Jiffy pod, transfer to a larger container with more soil.

REPURPOSED OBJECTS
You do not have to buy special flats to start your seeds. Use milk cartons and jugs or deeper plastic lids and plant away. You will either need to add drainage holes, or be careful not to overwater your seedlings. Start saving these items in January and February so you’ll have lots of containers in March and April.
I also save the black plastic containers my annual flowers come in, so I can start my own annual flowers year after year in those same containers.
BIODEGRADABLE NEWSPAPER CONTAINERS
This is my new favourite way to seed start, and they’re easily made by rolling up and folding strips of newspaper. If you need to move your seedlings, make sure that the containers have dried out –otherwise they will fall apart if you try to move them when wet.
HINTS FOR BEGINNER VEGETABLE AND FLOWER GARDENERS
If you’ve never started seeds before, here are a few things to remember:
• PLANTS NEED TIME TO GERMINATE.
This means your seeds won’t sprout for at least a week, sometimes more.
• WATER WHEN THE SOIL FEELS DRY TO THE TOUCH.
If the ground is pulling away from the edges, you’ve waited too long.
• WATERING FROM THE BOTTOM OF THE TRAY, not the top of the plant, is best.
• THE GROUND WON’T LOOK WET AT FIRST, but it will once the water has a chance to soak up.
• If you’re worried about overwatering or washing out your seeds, USE A SPRAY INSTEAD.
• Do all the fertilizer directions on the seed packet sound confusing? WATER WITH A FERTILIZER FORMULATED FOR SEED STARTING (it will be labelled as such) once every two weeks to give your plants an extra boost. You can follow the exact fertilizer directions once you gain more confidence as a gardener.
• START WITH NEW SEEDS. Some seeds can be viable for up to 10 years or more, but your germination rates decrease.
• STICK TO SEED STARTING TWO OR THREE TYPES OF PLANTS THE FIRST YEAR. It’s easy to get overwhelmed.
SEED-STARTING RESULTS
I think it’s important for you to see what kind of results you can get from seed starting for your window. Here are my peppers from spring 2019, which were started from seed in front of my south-facing window.
So that’s all you need to know about seed starting from your window in a nutshell. If you have any questions about the process, I’d love to hear from you on Facebook or Instagram.
(Kristen Raney is a former farm kid turned urban gardener and content creator of the popular gardening website, Shifting Roots. She is obsessed with growing flowers and pushing the limits of what can be grown in her Saskatoon garden. She also loves to grow tomatoes but, oddly enough, dislikes eating them raw. Kristen recently published an e-book on growing IG-worthy cut flowers in your backyard, and has another on creating an ever-blooming perennial garden coming out in spring 2020. You can find her gardening triumphs and failures on her blog www.shiftingroots.com, Instagram @shifting_roots, and Facebook @Shifting Roots.)
-Kristen Raney